
Understanding OBD Scanners and Their Role in Car Troubleshooting
What is an OBD2 Scanner and How Does It Work?
OBD2 scanners, also known as On Board Diagnostic tools, are essential for checking how well cars run and spotting problems thanks to the built-in computer systems in modern vehicles. When plugged into the engine control unit or ECU, these handy gadgets pull out those mysterious diagnostic trouble codes or DTCs that point mechanics toward whatever part might be acting up inside the engine bay. Beyond just finding faults though, good quality OBD2 scanners save both time and money at repair shops because they actually tell technicians exactly where to look instead of guessing around blindfolded. Mechanics can then fix things right away rather than spending hours troubleshooting wrong areas. Regular scans help catch small issues before they become big headaches down the road, so cars last longer between major repairs and breakdowns on the highway happen less frequently too.
Key Components: OBD Cable, Wiring Harness, and Diagnostic Ports
OBD cables serve as vital links between scanners and car diagnostic systems, making sure information flows properly between these devices. There are several kinds of OBD cables out there, each designed for particular connections that help maintain good data transfer reliability. The wiring harness matters just as much too since it plays a big part in how well the scanner works overall. A solid connection means better results when running scans. Finding where the OBD2 port sits on a vehicle makes all the difference in getting things done right. Most cars have this port tucked away beneath the dashboard area or somewhere close to the steering column. Mechanics know this well because they need quick access to run diagnostics efficiently without wasting time hunting around inside vehicles.
OBD1 vs. OBD2: Compatibility and Evolution
Back in the day, OBD1 systems were pretty much the start of onboard diagnostics, but they had serious problems because each car maker did things their own way. The whole mess made it impossible for mechanics to work on different brands without special tools for each one. That's why we eventually got OBD2, which finally created some common ground across all those different car models. Mechanics now have something that works consistently no matter what kind of vehicle they're looking at. For folks working on older cars though, there can still be headaches since some vintage models don't play nice with OBD2 equipment. Anyone thinking about upgrading their diagnostic gear needs to check if their shop actually deals with these older units. What really changed things was moving from OBD1 to OBD2 brought a bunch of upgrades too. We saw way more detailed information available, better fault detection, and overall much smarter diagnosis capabilities. Modern vehicles just aren't fixable without these improved systems anymore.
Preparing to Use Your OBD Scanner Effectively
Locating the OBD2 Port in Your Vehicle
To get started with any diagnostic tool, finding that OBD2 port should be the very first thing on the list. Most of the time, it sits right there under the dashboard close to where the driver sits. But don't assume this applies to every car out there. The actual spot changes quite a bit based on what kind of car we're talking about and who made it. Some manufacturers decided to put theirs over on the passenger side or somewhere near the middle console area. If someone spends five minutes flipping through their owners manual, they'll probably find exactly where it hides. Once located, figuring out problems with cars gets much easier. Just plug in that OBD scanner and start pulling up all sorts of useful info that helps diagnose issues without guessing around.
Checking Automotive Wiring Harness Connections
Secure connections within an automotive wiring harness matter a lot when it comes to getting accurate readings from OBD scanners. Without good contact points, there's real risk of losing data or interpreting signals incorrectly during diagnostic checks. Anyone working on vehicles should take time to look closely at their wiring harnesses for signs of wear and tear, physical damage, or corrosion buildup that might compromise how well everything connects together. Many technicians find that grabbing a multimeter helps confirm whether current flows properly through all those wires. Faulty connections definitely get in the way of proper car diagnosis. Regular inspection of these connection points keeps the scanner giving reliable information while also supporting long term vehicle health maintenance efforts across different makes and models.
Ensuring Proper Power Supply and Grounding
Getting good power and solid grounding matters a lot when working with an OBD scanner. Always start by checking what kind of juice the car battery is putting out before plugging anything in. If the ground connection isn't right, expect all sorts of problems talking to the car's computer system. Regular inspection of power sources should be part of normal car care routines anyway. Look at those connections every now and then to avoid headaches later on. These simple steps make diagnostics work better overall while keeping maintenance smooth sailing without unexpected hiccups down the road.
Step-by-Step Guide to Troubleshooting with an OBD2 Scanner
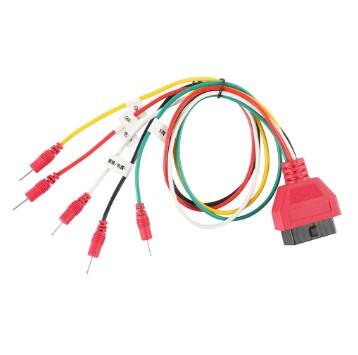
Connecting the Scanner: OBD2 Y-Cable and Port Setup
Getting good results from an OBD2 scanner starts with making sure it connects properly. First things first, turn off the car completely before plugging in that OBD2 Y-cable into the diagnostic port, which is usually found somewhere beneath the dash area. This special Y-shaped cable lets mechanics see several different data points at once, which makes finding problems much quicker. People often mess up during setup by not getting the connection tight enough or trying to use a damaged cable instead. These little oversights can really throw off how well the scanner works. Taking time to get everything right from the beginning will make all the difference when trying to figure out what's wrong with the vehicle.
Reading and Documenting Diagnostic Trouble Codes (DTCs)
Getting access to and keeping records of Diagnostic Trouble Codes (DTCs) makes all the difference when trying to figure out what's wrong with a car. First thing to do? Turn on the vehicle without actually starting it up. This little trick gets the electrical system running so we can hook up the scanner properly. Once connected, go through the scanner menu until those DTCs show up on screen. These codes give us pretty specific information about what might be going on under the hood. We really should write them down though, because having that paper trail helps spot problems that keep coming back and saves time later when similar issues pop up again. Take P0171 for example. That one usually means there's too much air mixed with fuel somewhere in the system. Knowing this kind of stuff cuts down on guesswork during repairs and keeps mechanics from tearing apart parts they don't need to touch.
Using Live Data Streams for Real-Time Analysis
Live data streams are essential when it comes to diagnosing vehicles in real time. They constantly feed information about important metrics like engine revolutions per minute, coolant temps, and how fast the car is moving, helping mechanics spot problems right away. When looking at all this info, technicians can adjust their diagnostic methods according to what they see happening now. What really matters though is watching out for strange readings or sudden changes in these numbers because those often point to issues long before any warning lights come on. Taking this kind of forward thinking approach means fixing things sooner rather than later, which ultimately makes cars run better and last longer. Mechanics who get good at reading live data tend to solve problems faster and more accurately across different types of vehicles.
Common OBD Scanner Connection Issues and Fixes
Resolving âNo Communicationâ Errors with Cable Harness Checks
Dealing with 'No Communication' errors when doing an OBD2 scan really gets under people's skin. Most of the time, these happen because the scanner just won't talk to whatever computer is inside the car. When this happens, folks usually see something like 'No Link' or 'Unable to Communicate' flashing on their screen. If that's what shows up, start by looking at the actual cables connecting everything together. Check those wires for any obvious damage or places where they might have broken apart. Also make sure the connectors are snug against both ends - one end plugged into the scanner itself, the other going into the car's OBD2 port. A lot of problems come down to simple things like connectors coming loose over time or getting dirty from being used outside. So take a moment to reattach anything that looks wobbly, give those contacts a quick wipe if necessary, and remember to turn the key to the 'ON' position without actually cranking the engine. Keeping those cables in good shape goes a long way toward avoiding these headaches down the road.
Addressing Low Voltage or Power Supply Problems
When an OBD2 scanner starts acting up, low voltage or power supply issues often come into play. The most obvious signs? Well, sometimes the scanner just won't turn on at all, or it flickers on and off randomly during use. This usually points back to the vehicle's battery struggling to deliver enough juice. To check things out, grab a multimeter and test the actual power coming out of the OBD2 port. Make sure it hits those standard voltage requirements before jumping to conclusions. If the numbers look bad, think about swapping out the old battery first. But don't forget to also look around for other culprits like rusty connectors or blown fuses that might be cutting off power flow somewhere along the line. Oh, and while we're talking about power sources, give the alternator a quick once-over too since faulty alternators can definitely lead to those annoying voltage drops. Getting stable power isn't just about making the scanner work properly; it actually makes a big difference in how accurate our diagnostic readings will be, which saves time and headaches down the road when trying to figure out what's wrong with the vehicle.
Fixing Protocol Mismatches (ALDL, MOBD, MUTT)
When there's a mismatch between scanner settings and what the car actually uses for communication, things go wrong fast. Cars out there run on all sorts of different onboard diagnostic systems - think ALDL, MOBD, MUTT among others - and this matters a lot because it determines whether our scanner will talk to the vehicle at all. Figuring out if we have the right protocol setup usually means looking through those spec sheets from manufacturers to see which OBD standard they support. What works best? Simply changing the scanner's settings so they line up with whatever protocol the particular car needs. Nearly every modern diagnostic tool lets technicians pick their preferred protocol right from within the settings options. Before diving into any diagnosis work though, double check those configurations first! Getting this part right makes all the difference between getting useful data and wasting time chasing ghosts during repairs.
Interpreting OBD2 Codes and Taking Action
Decoding P0xxx and Manufacturer-Specific Codes
Getting familiar with P0xxx codes matters a lot when trying to figure out what's wrong with today's cars because these codes act as standard warning signals that work the same way no matter which make or model we're talking about. Basically, all vehicles read these particular codes the same way, pointing towards problems in areas such as engines, transmissions, or emissions systems. Things get trickier though when looking at codes that are specific to certain manufacturers. Unlike the standard ones, these special codes differ between brands and models. Take P0301 for instance it usually means there's a cylinder misfiring somewhere, but if someone gets a manufacturer specific code instead, that often tells us something more detailed about how exactly that particular car works. Most people find themselves turning to internet tools and databases to make sense of everything. Online platforms offer breakdowns of what each code actually means, so both everyday drivers and mechanics can understand what needs fixing without guessing around blindly.
Prioritizing Repairs Based on Severity Levels
When looking at car problems, figuring out how serious they really are makes all the difference in getting things fixed right. Error codes tell different stories too some are just minor annoyances while others scream for help right away. Take code P0456 for example, which means there's a tiny emissions leak somewhere. That's probably not going to stop someone from driving home tonight. But then there's code P0700 warning about transmission trouble those kinds of problems tend to get worse fast if ignored. Mechanics who've been around the block know this stuff matters. They'll usually tell customers to tackle major safety concerns first because waiting can turn small fixes into big money pits later on. Most shops recommend handling brakes and engine issues ASAP while stuff like entertainment system glitches or minor cosmetic fixes can typically wait until regular maintenance time.
When to Clear Codes vs. Seeking Professional Help
Knowing when to reset those OBD2 codes or call in a mechanic matters quite a bit for keeping cars running properly. Sometimes clearing codes works fine if something small gets fixed and we just want to see if it comes back again. But folks really should know when they need someone who actually knows what they're doing with diagnostics. The red flags usually show up pretty clearly - check engine light still glowing after resetting, weird sounds coming from under the hood, car acting sluggish, or seeing several different codes pop up at once which often means bigger trouble lurking underneath. Just ignoring these codes or constantly wiping them clean without fixing whatever caused them in the first place tends to create bigger headaches down the road. What happens over time? Cars start performing worse than before, burn through gas faster, and eventually systems give out completely. Getting professional help sooner rather than later saves money and keeps vehicles healthier overall.
Advanced Tips for Maintaining Your OBD Scanner and Vehicle
Updating Scanner Software for New Vehicle Models
Updating scanner software regularly makes all the difference when it comes to getting good results and working with today's cars. New updates bring in fresh protocols and definitions that let OBD scanners read diagnostics properly on those newer models hitting the roads. Want to keep things running smoothly? Here's how it usually goes down: look for updates either via the app or manufacturer website, grab whatever files need downloading, then put them onto the actual device. When software stays current, the scanner just works better overall. It connects without issues to modern car electronics systems, which means mechanics and DIYers alike get more value out of their investment over time.
Preventing Future Issues with Regular System Scans
Doing regular system scans makes all the difference when it comes to taking care of cars before small issues turn into big repair bills. Most mechanics suggest getting a scan done around every three months or so, though folks with older cars that have clocked lots of miles might want to check things out even more often. There are some great mobile apps available now that can help track when the next scan should happen, sending alerts right to your phone so nobody forgets about important maintenance dates. Sticking with this kind of schedule helps keep vehicles running smoothly for years longer than expected, plus it means fixing minor problems while they're still easy and affordable instead of waiting until something breaks down completely.
Integrating OBD Data with Preventative Maintenance Schedules
When vehicle owners start integrating OBD2 data into regular maintenance routines, they often find their cars run better between service visits. The onboard diagnostics actually give pretty good info about what's happening under the hood, allowing for maintenance schedules that match real driving conditions instead of just following what the factory recommends. Most folks begin by looking at those OBD reports to spot recurring problems or unusual patterns, then build a preventive plan around things like oil changes, brake inspections, and replacing worn parts before they fail completely. Many drivers report significant improvements after adopting this method. One mechanic I spoke to mentioned several customers who avoided expensive repairs simply because they noticed warning signs through their OBD system readings months before any serious damage occurred.
Frequently Asked Questions
What is the purpose of an OBD2 scanner?
An OBD2 scanner is used to monitor vehicle performance and diagnose issues by accessing diagnostic trouble codes from the vehicleâs ECU. It helps in identifying malfunctioning components, reducing repair times and costs, and enhancing vehicle lifespan through proactive maintenance.
How do I find the OBD2 port in my car?
The OBD2 port is typically located under the dashboard near the driver's seat, but locations can vary depending on the vehicle model and manufacturer. Some automakers place it on the passenger side or near the center console.
What should I do if my OBD2 scanner shows a âNo Communicationâ error?
'No Communication' errors can often be resolved by checking the OBD2 cable harness for damage, ensuring connectors are securely attached, and making sure the vehicle's ignition is on without starting the engine. Regular maintenance of the cable harness is also recommended.
When should I update my OBD scanner software?
Regular software updates are important for ensuring compatibility with new vehicle models and improving diagnostic accuracy. Check for updates through your scanner's app or website and follow the instructions to download and install them.
Table of Contents
- Understanding OBD Scanners and Their Role in Car Troubleshooting
- Preparing to Use Your OBD Scanner Effectively
- Step-by-Step Guide to Troubleshooting with an OBD2 Scanner
- Common OBD Scanner Connection Issues and Fixes
- Interpreting OBD2 Codes and Taking Action
- Advanced Tips for Maintaining Your OBD Scanner and Vehicle
- Frequently Asked Questions